
Every great custom package begins with a creative design. Providing a design that can be properly translated from the print file onto the final finished piece is critical to achieving a finished product that reflects the design as it was envisioned. As such, proper file preparation is essential for your digital print job to run smoothly and print as expected.
In this article, we will outline the general steps to follow to help ensure your final artwork file is print-ready for the digital production process. Please note: These steps reflect The BoxMaker’s process and may not be the same for your print provider of choice.
After building your artwork using Adobe Illustrator, InDesign, or Photoshop, now it’s time to prepare your file for submission:
Step #1: Check Your Work
Once the creative elements of your design are finalized and approved by your team, it’s time to ensure that each element is print-ready. Check your file for the following:
Image Resolution
All images must be a minimum of 300 dpi for best results. If you’ve pulled down a copy of your logo or artwork from the web, it may only be set to 72 dpi (web resolution). This resolution is not high enough quality for digital print.

Outline All Fonts
Be sure to convert all fonts to outlines to ensure that your specific typeface can be replicated in production.
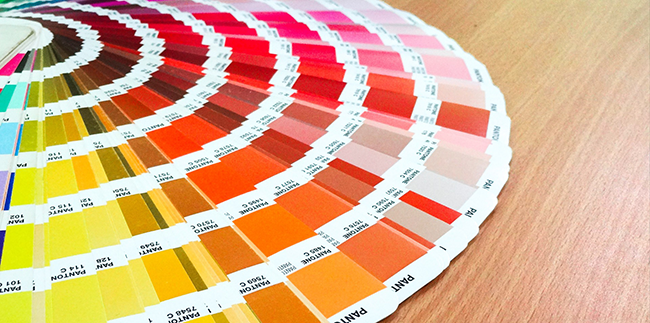
CMYK Color
Since digital printing uses the CMYK color spectrum, your file must be in CMYK color mode. All spot colors will be converted to CMYK, and including Pantone® swatches could have unintended results.
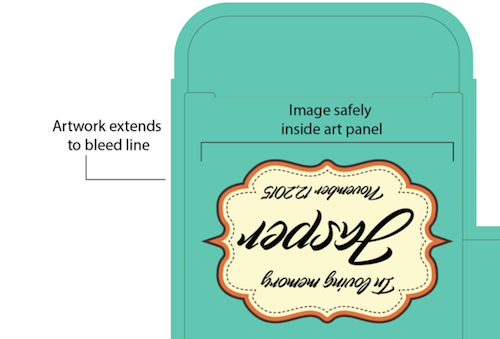
Understand the Dieline
Your artwork file will include a dieline, which is the flattened outline of your packaging product (such as a box, label, or display). Make sure your artwork is within the edge of the dieline to ensure it is within the printable range. Also note that any important images and copy should be placed at least 1/8” from cut and crease lines.
Bleed Lines
If you are trying to achieve edge-to-edge printing, extend your artwork beyond the dieline by ¼” to the bleed line of your file (which may or may not be visible). Anything placed beyond this bleed will be automatically removed during artwork processing.
Step #2: Choose the Right File Type
We highly recommend clients submit native files or open files for the best results. This allows our graphics department to easily review and work within your file. Be sure to submit a layered native file — do not merge your layers. The dieline should also be on its own layer.
If you choose to save your file as a PDF, it must be saved in high resolution.
If you’re using Adobe InDesign, Illustrator, or Photoshop, it’s critical to supply all the elements used within the file, such as images and graphics. You can manually include all the source images in a separate folder or use the Package command for InDesign.
Step #3: Zip It Up
The next step is to compress (ZIP) your artwork folder so it can be easily uploaded. Rename the folder to include the name of your organization, followed by the project name. This is helpful for the graphics department to be able to identify the specific project. For example: The BoxMaker – Promotional Mailer Box.
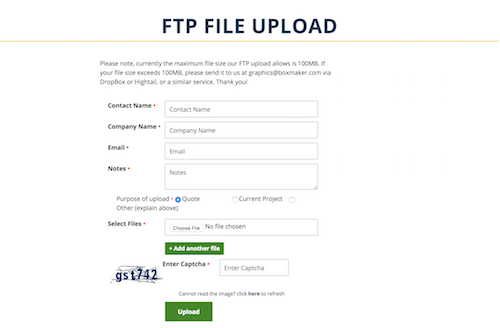
Step #4: Upload Your Artwork File
The final step is to upload your artwork file. Go to: http://www.boxmaker.com/resources/ftp-file-upload/, fill out your information, and upload your compressed file.
Consult with The BoxMaker
After successfully submitting your artwork file, it will be carefully reviewed by our graphics department before entering production. You will be notified immediately if any issues arise.
If you have any questions or issues with submitting your artwork, consult with our Packaging Advisors. Our experts will work closely with our professional graphics team to ensure your artwork file is optimized for digital print and that your desired packaging outcome will be achieved.

Share this post
How to Design a Custom Product Label for Digital Print
Master the art of digitally printed custom labels with our guide. Explore essential steps and benefi …
Brand Color Management: How Can G7 Certification Help?
The BoxMaker achieved G7 certification across our wide-format digital printers. Learn how partnering …

Litho Lamination vs. Digital Print for Retail Packaging
Learn about comparing Litho Lamination vs Digital Print and how technological advancements in digita …